No matter what equipment you use for photography, there are two fundamental things to understand: first, how the light in the three-dimensional world is presented on the surface of the sensor, which is called imaging; second, how the brightness of light is converted into stored pixel values, which can be called light sensing. If you want to get good value for money while enjoying photography on a budget, you need to fully grasp the mysteries behind these processes to spend money on the right equipment. In this article, I'll briefly outline the basic principles of imaging. Optical terms are for research purposes, so I'll try to explain things in plain language.
1. Object Plane and Image Plane
Imagine a white wall with a rectangular black frame and a black dot in the center. Point your camera at the black dot, adjust the focal length or change the shooting distance (using the "zoom with your feet" method), so that the edges of the rectangle just fit the edges of the sensor, then focus clearly. At this point, we can consider that any point within the rectangular frame is imaged through the lens onto the corresponding point on the sensor.
In this scenario, the white wall is the object plane, and the sensor is the image plane. Ideally, only points strictly on the object plane can be sharply imaged onto the image plane. If a light-emitting point is moved away from the wall (such as the head of a thumbtack), its image will form either in front of or behind the image plane, resulting in an unclear image on the image plane.
Due to the reversibility of light paths, if we treat the sensor as a light source, the image of the sensor in the previous scenario should appear as a rectangular frame on the white wall (similar to a projector). Understanding this helps clarify what focusing is: reversing the sensor's image through the lens to form a rectangular frame outside the lens, and aligning it with the subject you want to photograph.
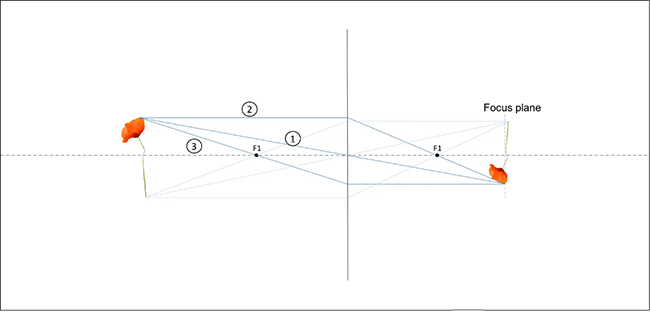
Image source: Aukje@35mmc (online image)
2. Lateral Magnification and Angle of View
Except for macro-specific lenses, the rectangular frame on the wall is usually much larger than the sensor. The magnification is the ratio of the sensor size to the size of the rectangular frame (in this case, it is a number less than 1). Magnification is not fixed for a single lens; it depends on the imaging scenario at the time. For example, a lens with a focal length of 105mm and a magnification of 0.5 can only achieve this magnification when the object is at its closest focusing distance (at this point, the side length of the viewing rectangle is twice that of the sensor). However, when using this lens to photograph distant scenes normally, it performs like an ordinary 105mm lens.
From experience, when the object distance is much larger than the focal length, the angle of view seems fixed and does not change with the distance of the object. This is based on the fact that the image distance is approximately equal to the focal length in such cases. Since magnification equals the ratio of object distance to image distance (by similar triangles), it is roughly equal to the object distance divided by the focal length. As the object moves farther away, the magnification decreases, resulting in a nearly constant angle of view. It can be imagined that different points on the sensor correspond to the convergence points of light rays coming from different parallel directions at infinity. The approximate formula can be derived as:
Angle of view = 2 arctan (sensor side length / (2 focal length))
When the focal length is relatively long, the angle of view is approximately equal to (sensor side length / focal length), in radians (multiply by 180/π to get the degree).
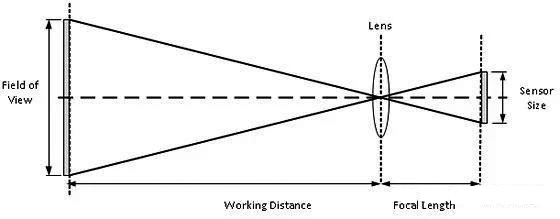
Image source: dpreview (online image)
3. Aperture and Depth of Field
Since only light points on the object plane can be absolutely sharply imaged, how far in front of and behind the object plane can objects be imaged with acceptable sharpness?
First, we need to define what constitutes acceptable sharpness—for example, the size of a pixel on the sensor, the grain of film, or the limitation imposed by the lens's own aberrations? Then, as long as the size of the light spots formed by points in front of and behind the object plane on the image plane does not exceed the acceptable size, the imaging can be considered sharp.
So, how far does the depth of field extend? As shown in the reference diagram from the internet below, we can consider the following approximation: if a light point on the object moves backward by a certain distance, the light rays from the light point to the edge of the lens aperture will pass through the object plane, forming a light spot (generally approximated as a circle). This spot is imaged on the image plane with a corresponding size (multiplied by the current magnification). If the size of this imaged spot does not exceed the aforementioned limit, the object can be considered still within the depth of field.
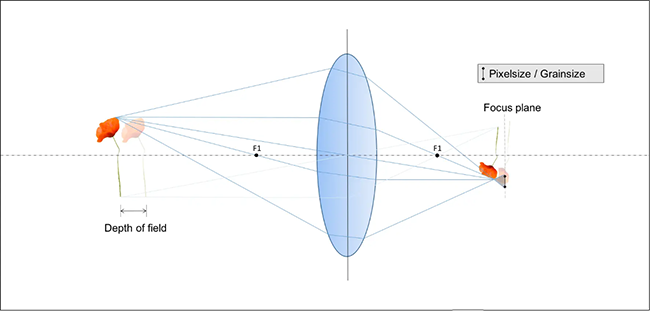
Image source: Aukje@35mmc (online image)
From this understanding, the main factor in calculating depth of field is the angle formed by the aperture diameter and the object distance (a term known as the object-space numerical aperture). The depth of field can then be approximated by dividing the minimum distinguishable size on the object plane (proportional to the object distance) by this angle. The conclusion is that depth of field increases with the square of the object distance. For the same object distance, it is related to the physical size of the aperture (when the lens focal length changes, it is not just about the f-number). Additionally, the depth of field behind the object plane is slightly larger than that in front of it (you can try drawing a diagram to confirm this).
Therefore, if you want a shallow depth of field with a good blurring effect and large circular bokeh spots, you need to use the largest possible aperture (long focal length + large aperture), shoot the subject from a close distance, and ensure that the off-focus light points are as far away from the focal plane as possible.
Conclusion: That's all for today. In fact, there is much more optical knowledge related to imaging, such as aberrations, diffraction that determine imaging sharpness, as well as field curvature and distortion. These will be discussed in detail later in combination with appropriate lenses.
Related Tags: Experience in using cameras The imaging principle of photography